

CONTENTS (old style)
509 Center
Bay City, Michigan
Sales (989) 892-9242
Support (989) 686-8860
Plb-0446.cfm v1.0
- HISTORY of PL/B and Databus
- BASICS of PL/B programming
- MMCC Standards
- Anchoring objects
(as part of split screen discussion)
-
API Notes on Windows API calls
-
ASCII Good table of codes
-
BINARY LOGIC.
-
BUTTONS.
-
Base 64 encoding
An article by John Walker, founder of Autodesk, Inc. and co-author of AutoCAD. From Fourmilab Switzerland.
-
CALL/CALLS
and Subroutines including ROUTINE, LROUTINE, PROCEDURE, and LOADMOD
- Character Mode Forms
DOS-style, character mode screens
- CLOCK
(Get's lots more than just the time!)
-
COLORS
 COMBOBOX
DATALIST.DIR method to fill a datalist also works with Combo.
- CONTROLs and Objects
- CPU USAGE
notes and comments
- Cursor Keys
notes on detecting cursor keys, etc.
- Sunbelt's History of Data Access
- DATALIST general topic
DATALIST.DIR method to fill a datalist with file directory
- Distributing programs
& Runtime considerations
- Docking Objects
(as part of split screen discussion)
- DOS
DOS-style, character mode screens
- EditText (RichEditText)
- E-Mail notes
- EXPLODE instruction
- Events
notes on cursor keys, etc.
- Executing programs
What Program to Load 1ST
Comments on executing compiled programs and systems.
- Expressions
such as:
IF ((QUANTITY * POUNDS_EACH) > CART_MAX)
- FILES
Notes on opening files
FILELIST for managing multiple indexes
FINDFILE/FINDDIR for gathering information about a file
DATALIST.DIR method to fill a datalist with file directory
Image File Types
GETFILE
READ
Sunbelt's History of Data Access
- FILE MANAGER
- FLOATMENU and RIGHT CLICK
- FOCUS and VALIDATE
- FONTS
- FTP from PL/B
- GETFILE
- GETINFO
- GETMODE
Lots of good information including names of INI files
- GUI vs Procedural Comments and notes
- ICONS
- INIT / Literals
- IMAGE LIST
- INI FILES
Image File Types
GETMODE INI file names
CLOCK INI data items
PLBWIN License data
- LICENSE
PLBWIN License data
- ListView
-
LOADMOD
including ROUTINE, LROUTINE, PROCEDURE, CALL and CALLS
- MENUS
- NUL strings
- OPENING FILES
Notes on opening files
FILELIST for managing multiple indexes
DATALIST.DIR method to fill a datalist with file directory
- O'Reilly Website
Notes on the tests we ran YEARS AGO.
- Panel object (and split screens)
- Percent PROGRESS
- PICTURES
- PRINT SCREEN (Printing a form)
- PRINT
DOS style printing direct to LPTx
- PRTOPEN PDF
PDF built into 9.6
- PRTPAGE
Selecting and opening a printer
*UNITS
*PICT
Printing a screen image
Printers (names, managing, etc.)
- Program Distribution
& Runtime considerations
-
RESOURCE lists.
Embed pictures, movies, etc. into your PLC.
-
REVDATE
application program version control
- RichEditText (EditText)
-
ROUTINE
including ROUTINE, LROUTINE, PROCEDURE, CALL and CALLS
- RUNTIME : PLBWIN runtime considerations
- RUNTIME VERSION See CLOCK VERSION
- RIGHT CLICK and FLOATMENU
- SCREEN HANDLING:
- .SHOW show/hide window
- Manual SCROLL BARS
- Splitter object
- Split Screen Windows
- Print Screen
- See also Window topic
- SOUND FILES
Playing music, etc.
- SQLIO SQL Lite support within PL/B
- STRINGS
- SDB386 and SUNDBCMP
- Subroutines
including ROUTINE, LROUTINE, PROCEDURE, CALL and CALLS
- TAB CONTROL
- Toolbar / Toolbutton
- TreeView
- Transactions
- Program execution
What Program to Load 1ST.
Comments on executing compiled programs and systems.
- Techniques and Comments
getting sample code
multi-line stattext
layered objects
zorder
radio group
UTF-8UFT-8 format
- VALIDATE and FOCUS
- VERSION control
GETMODEprogram & compiler versions
CLOCKrumtime version
- VERTICAL SCROLL BARS (manually coded)
- WINDOW OBJECTs
hiding the window (.SHOW)
controlling position on screen
stretching and shrinking window and all objects
See Screen Handling topic
- Xfiles
X-file notes - SCREEN HANDLING:
plb-t010.cfm
ANSI Standard PL/B Language and Visual PL/B
PL/B Sunbelt License
WINDOW Panels and Split Screen Notes
TOPICS:
- Split screens using panels and splitter objects
- Split screens by manual methods
- Anchoring an object
- Docking an objects
WINDOW Screen Splitters
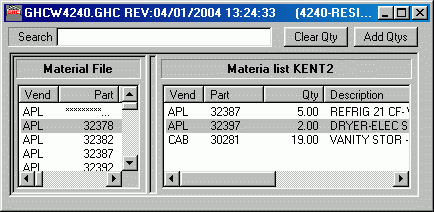 The screen shot to the right shows a window with a large panel in the middle and LEFT/RIGHT ListViews with a splitter between them.
Sliding the splitter left and right resizes everything!
This is totally controlled by the FORMS DESIGNER and the PL/B RUNTIME. (The feature requires version 8.7c or greater).
Although this is not difficult, there are tricks to getting it all to work together in the way that you want. In particular, this form uses multiple objects in the panels and they must be identified with proper Z-ORDERs to get them in the right positions.
Here's the steps and some notes used to create a screen similar (but simpler) than the one above.
-
 First, the concept. All we want is to have the stattext/listview pair on the left and the pair on the right to be sized left and right with the splitter bar that appears between them. Slide the splitter and the window panes changes as above.
- The splitter requires some kind of "container" (my word). If you don't have a panel or something, the splitter works on the entire screen.
- The ANCHOR and DOCK properties are both needed in some ways. But the objects need to be set up in the proper order.
- Here's what was done:
 the main screen was built with an edit text and a button at the top.
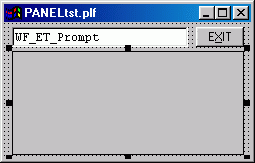 A main panel (PANEL001) was put on the form below those objects.
- ANCHOR: Top,Bottom,Left,Right
- DOCK: NONE
- BORDER: Single fixed
The Panel is NOT DOCKED. Docking takes it to the physical position called for.
Note that once inside the panel, ANCHOR doesn't seem to matter. DOCK is the operator and it trumps ANCHOR.
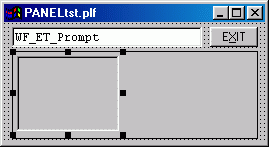 Now add a second panel (PANEL002) inside the main PANEL001.
- DOCK: LEFT
- BORDER: none (although a border helps during design)
- Make a note of the Z-ORDER.
-
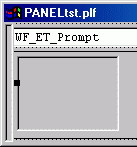 Create a splitter (SPLITTER001) object.
- Do this on the main body of the screen.
- Set the border to 3-D so you can see it easily.
-
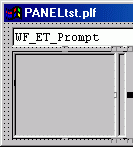 Now put the splitter onto the main panel
- DRAG it so that the TOP LEFT corner is INSIDE the main PANEL001. (If you don't get the top left inside, it will try to grab the left side of the window and become full height.)
- DOCK: LEFT
- BORDER: 3-D
- Insure that the Z-Order is greater than the second panel.
-
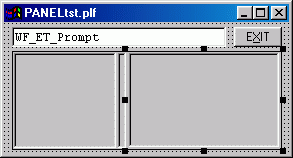 Create a third panel (PANEL003) inside the main panel and to the right of the splitter line.
Note that this last one should be docked FULL. That will make it fill the right panel window when the splitter is moved.- DOCK: FULL (don't forget this)
- BORDER: 3-D
- Insure that the Z-Order is greater than the splitter.
- Note that the Z-ORDER controls how the objects dock to each other. PANEL001, SPLITTER001, PANEL002. Each is docked LEFT with an increasing Z-ORDER so that they relate to each other and each docks to the left next to the previous object.
- Now you can create things inside each of the interior panels. Do it the same way, paying attention to DOCKING and to Z-ORDER.
- We should be done!
OTHER NOTES:
- SAVING POSITION ON EXIT.
Our practice is to save all window coordinates on exit and then restore them when the program is next used. That is, if the user resizes the screen and moves it to a different position, we know that and put it back next time in.
Splitters are a bit special. You DO NOT position the splitter, rather you work left to right resizing the other objects.
In the example at the top, we store the WIDTH of the leftmost sub-panel (Panel002) and reset that width after the form is repositioned on entry.
Before Sunbelt introduced panels and splitters at the November 2003 User's Conference, we had been doing the same thing manually. Notes on that follow. |
All our screens allow resizing by draging sides and corners.
I use the RESIZE event on the window itself to trigger that. The resize routine gets the coordinates (top, left, width, height) of some key anchor points and then calculates the size and position of other objects based on these. (It's tedious work, but the results are very satisfying.)
Before the Panel and Splitter objects were added to PL/B 8.7c, we did panels manually. An example is shown below:
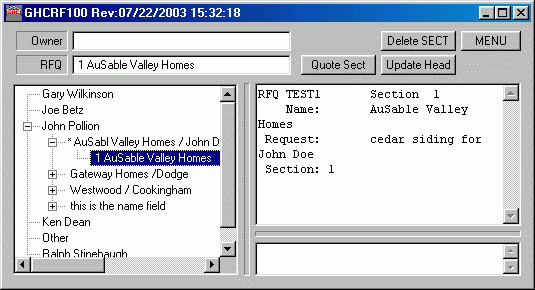
For the split screen I use a STATTEXT for my splitter lines or bars. In the designer I make these nice and fat then resize them to skinny and tall (or wide) when the program loads the form.
The resizing routine gets the position of the horizontal and vertical splitter STATTEXTs and sizes the basic three panel screen first. Then it continues to position other objects within those bounds.
Moving the splitter STATTEXT "bars" requires two things. First, the program must turn on dragging. You can't do that in the forms designer. Use "DRAGITEM {StatText name),ON" after the form is loaded.
Second, I use the MOVE event on the StatText to see when a user moves it. With DRAGITEM on, the move event triggers when they release the mouse button. At that time I call my resize routine which positions everything to the new coordinates.
To prevent the user from getting the screen totally out of whack, I set some minimum and maximum ranges on the splitter line positions. If they drop the thing too close to the top, bottom, left or right, I override their position with the minimum settings.
NOTE: I've noticed a couple of behavioral aspects to this process. First, you can make the splitter stattext skinny, but not TOO skinny. It must be wide enough to allow the user to find it with the mouse.
Second, when dragging the stattext, the move event may not trigger if they move portions of the stattext outside of the window boundaries. For example, you can drag the vertical bar off the left or right side, but if the top or bottom end of that bar is off screen you may not get the move event. Or something like that... I'm not completely sure what's happening there.
On that same note, moving too fast, or without a firm finger on the button, you can lose the HAND cursor and get nothing. But a few minutes practice overcomes that problem.
(This was developed under PLBWIN 8.6.)
ANCHORING AN OBJECT
The ANCHOR property allows objects to be automatically resized relative to how they were positioned in the forms designer.
This is not a true Windows property. Rather it is a function of the designer and the runtime.
The anchor options in the designer are:
- Bottom,Left
- Bottom,Left,Right
- Bottom,Right
- Top,Bottom,Left
- Top,Bottom,Left,Right
- Top,Bottom,Right
- Top,Left
- Top,Left,Right
- Top,Right
If, for example you use TOP,LEFT, then the object won't seem to ever move as the screen is resized. That's because it will always anchor to it's top left position in relation to the window's own top left.
If, on the other hand, you anchor to the BOTTOM,RIGHT the object will retain it's original size but will always move to the bottom right corner of the screen. OR AT LEAST to it's position relative to the window's bottom right corner at design time.
Saying that another way. The object is defined by Top, Left, Width, Height properties. Using those, the designer can compute the bottom right corner and can compute position's offset within the window frame. For example: 10 pixels above the bottom of the window and 20 pixels from the right window frame. If the window is resized at runtime, the Width and Height are recalculated to come up with the same displacement from the new window frame.
The various permutation of the anchor points are all designed to produce relative spacing from the sides of the window. Top,Bottom,Left,Right scales the entire object.
ANCHORING IN PANELS
Panels seem to work like a container or a collection. If an object is defined as part of a panel, then the object scaling based on the anchor are in relation to the PANEL's sides, not the window's sides.
Z-ORDER may be significant in the relationships when anchoring. This has not been confirmed.
Docking allows you to create a relationship between objects which is maintained as the screen is sized and objects are moved.
Objects are docked in relation to a "container". The basic container is the window itself. Dock to the left and the object will always slam into the left side of the window.
The container can also be a panel. In this case, the object is docked to the edge of the panel.
Objects can dock to other objects. This is done based on Z-ORDER. The object with the lowest Z-Order docks to the edge of the container and each higher Z-order objects docks to it's neighbor.
Panels can be nested. In the example above you have a master panel which contains two sub-panels with a splitter between them. The first sub-panel is docked to the left side of the master panel, The splitter docks to the side of that sub-panel, and the second sub-panel docks to the splitter.
Docking has a special relation to the SPLITTER object introduced in 8.7c. A splitter can be moved with the mouse. If objects are docked to the splitter they are moved to match.
Docking, Panels, and Anchor all work together and must be kept in mind.
An object can be docked to its container as:
- Bottom
- Left
- None
- Right
- Top
- Full (to all sides of the container)
(Also see Window Objects page.)
v1.10
Write to MMCC Technical Support at: Send e-mail to MMCC.
MMCC - Technical Support
600 W. Midland
Bay City, MI 48708
(989) 686-8860
600 W. Midland
Bay City, MI 48708
(989) 686-8860